
Introduction
This post serves as a guide to develop a DataStage job that processes data in a generic way to extract from multiple flat files and to load into multiple targets using Schema Files and RCP (Runtime Column Propagation) concepts of DataStage.
The goal of this post is to create a job that can be used to move data from a flat file to a table in a generic way and also to enhance it in a way to process a new flat file to load the corresponding table in each run.
RCP helps developing a generic job when the Source is a database, as meta-data is discovered automatically. How do we create generic jobs that will process flat files? The answer is Schema Files.
· Create a Schema file.
· Create a simple, parallel copy job to using a source file to load a target table.
· Enhance the job to run for any number of flat files using sequencing and looping capabilities of DataStage.
Runtime Column Propagation
InfoSphere DataStage is flexible about metadata. It allows us to skip the metadata details partially or entirely and specify that, if it encounters any extra columns while running, it should interrogate their source, pick them and propagate them through the rest of the job. This is known as Runtime Column Propagation (RCP).
Schema Files
InfoSphere DataStage has two alternative ways of handling metadata, through table definitions, or through Schema files. So, metadata for a Stage can be specified in a plain text file known as a schema file. Schema files allow moving of column definitions from the job to an external file. This is not stored in the Repository. Some parallel job stages even allow usage of partial schema. This means that you only need to define column definitions for those columns that you are actually going to operate on.
If you intend to use schema files to define column metadata, runtime column propagation should be turned on.
This can be enabled or disabled for a project via the Administrator client, for a job via the Job properties in the Designer client, and is set at Stage level via the Output Page, Columns tab for most stages, or in the Output page, General tab for Transformer stages.
Simple Copy Job using RCP and Schema File
Development of a simple copy job fetching data from a Source and loading it into a target table is illustrated below.
Creation of Source and Schema File:
Create a source file ‘EMP.CSV’ containing four fields- Name, Designation, Base location and Pin-code as shown below.

Now create a schema for the above file. A schema file is simply a text file containing an orchestrate table definition. The schema file for the employee file is shown below. The data types used here are internal data types and not SQL data types used in column definitions. Note also that the format tab of the Sequential file stage is ignored if a schema file is used. The schema file should contain the formatting options as shown below.

Development Steps
1) Drag three stages i.e., one sequential file stage, oracle connector stages- for target and one copy stage, on to the canvas from palette and connect and name them as shown in the below design.

2) To ensure that RCP is enabled at Project level, go to Designer Client, Job Properties and in General tab, ensure that ‘Enable Runtime Column propagation for new links’ check box is enabled and checked.

3) Switch to Parameters tab under Job Properties and define job parameters for the source and target. Once done, click OK.

4) Open the Source Sequential file stage. Define ‘file’ property with the job parameter. Choose ‘Schema File’ property from Options category and assign job parameter. It should look now as the one below.

Keep the other properties as default and click OK
5) Open the target Oracle connector stage and define the Target connection properties in the ‘Connection’ block. Specify the following in ‘Usage’ block:
§ Write Mode : Insert
§ Generate SQL at runtime : Yes
§ Table scope: Entire table
Keep the other properties as default and click OK

6) Check if RCP is enabled in all stages. Go to columns tab in Source Sequential File stage, Copy stage and ensure that Runtime Column Propagation check box is checked. Also note that we have not defined any columns in either the source or the target. At runtime, DataStage will adopt the column definitions from the schema file and propagates those definitions down the stage.

7) Save the job as “Generic_Job_Schema_File”, compile it. Run the job and provide source and target table names.

8) Check for any warnings/errors in the log of DS Director and validate the data loaded into target.

Target Data:

So, this job can now be used to copy data of any table.
Sequencing and Looping
The job developed above can process any number of files and tables but only one file and table at time. If we need to process some hundred files, we need to provide parameters hundred times manually. To avoid manual insertion, there is a need to control this job in some sort of loop such that a new file is processed on every loop.
This can be done in many ways – a shell script with a dsjob command, a sequence with the names of the tables hard-coded into the StartLoopActivity and so on. The approach taken here will be a combination of a Server Routine, a Sequence Job and a text file.
· Create a Comma separated value (.csv) file. This file consists of the source file name, Source schema file name and target table name that are to be processed as records. One record for each file to be processed and each record is a comma-delimited containing these three fields
· Write a routine that takes the above comma delimited file as input argument and reads the three fields - the source file name, the schema file name and the target table name, loads each record into a dynamic array and then returns the array.
· Create a sequence that calls the routine once and then loops through each element in the array passing the required fields to the job activity stage.
Creating List of Tables
Create a file by name “list.csv” with two records as shown, containing two fields in each record separated by a comma.

Creating DS Routine
Create a simple server routine, taking one argument which is the fully qualified file name (including the path) of the file created above. This routine opens the file, reads line by line, breaks each line into fields, pushes them on to a dynamic array and returns it to the caller.
Go to New, select Server Routine from Routines. Provide a name for the routine, say “ReadFile”. Unless you name the routine, the code tab will be not enabled. Now go to the Code tab and enter the code below. Save and Compile it.
Routine = 'ReadFile'
vFileName = Arg1
vCounter = 0
OPENSEQ vFileName to vFileHandle
Else Call DSLogFatal("Error opening file list: ":vFileName,Routine)
While READSEQ vLine FROM vFileHandle
vCounter = vCounter + 1
CLOSESEQ vFileHandle
Ans = vArray
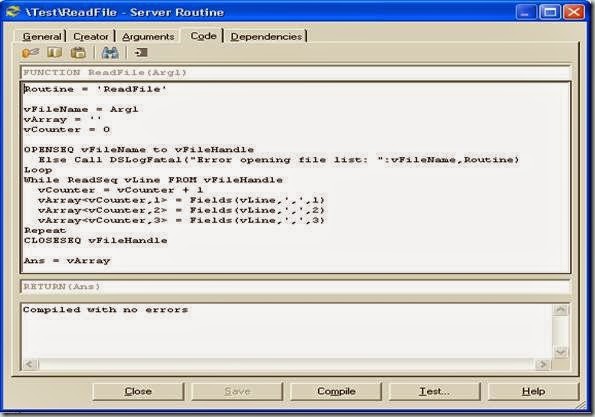
Now click the Test button and provide the filename (including the path) and click Run.

This routine will output a dynamic array as shown below, consisting of fields separated by field marks (F) (ASCII 254) and each field containing values separated by value marks (V) (ASCII 253).
“D:\Reporting\Training\Practice\empcsv.csvVTGT_EMPVD:\Reporting\Training\Practice\empcsv.osdFD:\Reporting\Training\Practice\unitcsv.csvVTGT_UNITVD:\Reporting\Training\Practice\unitcsv.osd”
Creating Sequence
This Sequence job calls the routine and passes the text file as parameter. It then dissects the output array into individual fields and calls the generic job and passes these fields as parameters.
Development Steps:
1) Go to New, select Sequence Job from Jobs. Drag three ‘User Variable Activity’ Stages, one ‘Start Loop Activity’, one ‘End Loop Activity’ and one ‘Job Activity' Stage onto the canvas. Connect them as shown. Name each stage as in the picture.
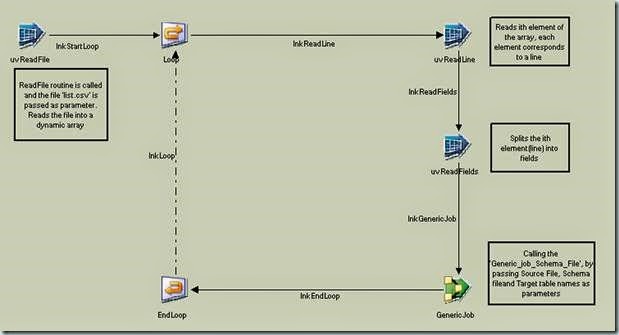
2) Define two job parameters ‘FileList’, ‘NumOfFiles’ in parameters tab of job properties. Name of the .csv file will be passed at run time to ‘FileList’ and the number of files in the list that are to processed is passed at runtime to ‘NumOfFiles’ parameter .
3) Go to the first user variable activity of the sequence (uvReadFile). In the ‘User Variables’ tab, add an activity variable and name it ‘fileList’. In the expression call the routine ‘ReadFile()’. Pass job parameter ‘FileList’as argument to this routine. This routine reads the text file passed to it at runtime via ‘FileList’, stores the dynamic array in the activity variable ‘fileList’. Once done, Click OK.
‘fileList’ will store the below string:
“D:\Reporting\Training\Practice\empcsv.csvVTGT_EMPVD:\Reporting\Training\Practice\empcsv.osdFD:\Reporting\Training\Practice\unitcsv.csvVTGT_UNITVD:\Reporting\Training\Practice\unitcsv.osd”

4) Open the Start Loop Activity (Loop). We need to setup the looping activity in this stage. Go to ‘Start Loop’ tab, choose ‘Numeric Loop’ as Loop Type.
In the Loop Definition, set ‘From’ value to 1, ‘Step’ value to 1 and ‘To’ value to job parameter ‘NumOfFiles’. Value of this parameter determines the number of iterations the Sequence has to execute.

5) Go to User Variable tab of the ‘uvReadLine’ activity stage, a variable ‘fileListRecord’ is setup. In the expression, ‘Field ()’ function is used to get the ‘ith’ record of the dynamic array and store it in the variable. For the first iteration, the counter variable of Loop stage will be 1, hence the expression and output will be :
Field (uvReadFile.fileList, @FM, 1) =>“D:\Reporting\Training\Practice\empcsv.csvVTGT_EMPVD:\Reporting\Training\Practice\empcsv.osd”
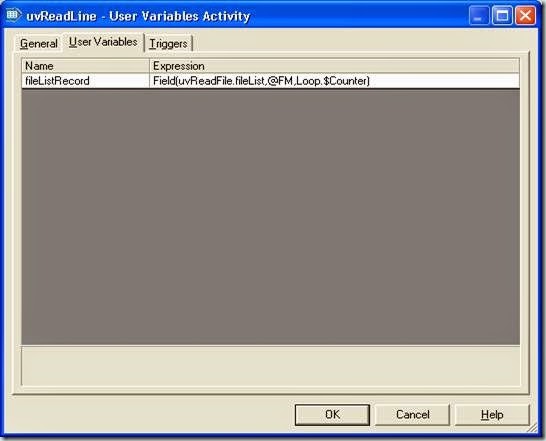
6) In the ‘uvReadFields’ activity, three activity variables are setup. In the expression, the output of the uvReadLine stage is further split into individual variables, using value-mark @VM as delimiter in the Field() function. For the first iteration, the values of the two variables will be:
sourceFileName: D:\Reporting\Training\Practice\empcsv.csv
targetTableName: TGT_EMP
sourceSchemaName: D:\Reporting\Training\Practice\empcsv.osd

7) Open the Job Activity Stage, select ‘Generic_Job_Schema_File’ job from repository. Change the ‘Execution Action’ as ‘Reset if required, then run’. By default the parameters defined in the job will get populated in parameters. Click ‘All to Default’ to set default values, if any, defined in the job for these parameters. Input ‘sourceFileName’, targetTableName’ and sourceSchemaFileName as values to ‘jpSourceFile’, ‘jpTargetTable’ and jpSchemaFileName parameters.
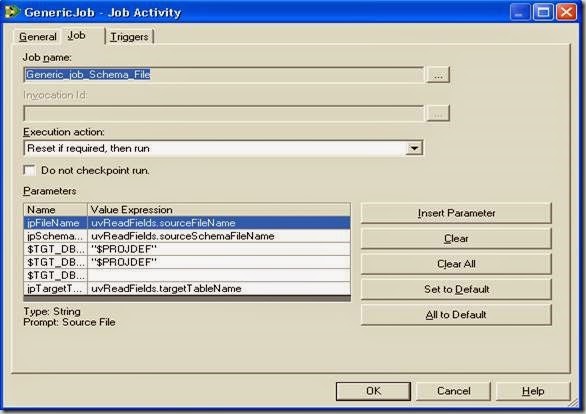
With this step, the development of the sequence is completed. Save and Compile the Job, click RUN and provide inputs i.e., the file name and the number of tables the job has to process (2 in this case). For example if the file has 100 tables and if only first 10 tables of the list are to be processed, just specify 10.

Verifying the Results:
Check for the DS log in Director for warnings and errors, verify the data and count in both Source and Target. The number of iterations the job is executed can be seen in the log. In this case, both sources have two records each. After the completion of the job, the count is found same in both the targets.
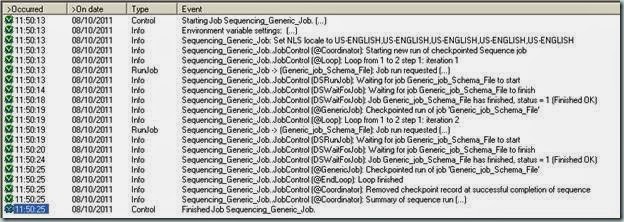
Thus this set – one ‘Generic Job’, one ‘Sequence’, one ‘DS Routine’ and a simple ‘text file’ can now be used to greatly reduce the time spent on creating jobs for processing flat files to a landing area or to load from final staging area to EDM/EDW, where no processing is required. Choosing this design makes maintenance easy. For example, if a particular file needs to be added or deleted or if the job has to run only for a particular file to be processed, only the text file and parameter needs to be changed. Also, to edit a text file no extra skills are required.
· IBM InfoSphere® DataStage Parallel Job Developer Guide
· IBM Orchestrate 7.0 Record Schema Syntax
· BASIC Programming in IBM InfoSphere® DataStage Server Job Developer's Guide.